Your Complete Transfer Guide with Expert Tips
A Comprehensive Guide by Paul from Audio Support
Moving your entire Logic Pro setup to a brand new Mac can feel like a daunting task. From ensuring all your precious projects are safely transferred to wrestling with plugin authorizations, there’s a lot to consider. This comprehensive guide provides you with the essential steps and expert tips to navigate this transition smoothly and efficiently. If you’d rather leave the technical complexities to an experienced Logic Pro professional, Audio Support is here to provide personalized remote assistance every step of the way.
Contents:
- Why You Should NOT Use Migration Assistant for Your Music Software
- Step 1: Preparing Your Old Mac for Logic Pro Transfer
- Step 2: Setting Up Logic Pro on Your New Mac
- Step 3: Transferring Project Files
- Step 4: Final Checks and Troubleshooting
- A Note on the Creation of This Guide
- Why Choose Expert Support for Your Logic Pro Migration?
Why You Should NOT Use Migration Assistant for Your Music Software

While Apple’s Migration Assistant can be incredibly convenient for transferring general user data to a new Mac, it can actually cause significant problems when it comes to complex music software like Logic Pro, and especially your third-party applications and plugins.
Old versions of your apps and plug-ins are transferred to your new Mac, but they may be incompatible with the updated macOS and hardware. Incompatible third-party apps and plug-ins are the biggest cause of crashes, slowdowns, and system errors in Logic Pro.
I would recommend using Migration Assistant to move your User profile (documents, photos, etc.), but untick Applications and Other Files and Folders during the process.
The core issue is that Apple’s Migration Assistant moves your plug-ins to your new Mac but does not update them. It can also miss crucial files which your plug-ins need on your system to be able to run properly, leading to instability or them simply not appearing in Logic Pro.
The only safe and reliable way to move your plug-ins and other music-related software to your new Mac is to download the correct, up-to-date, and compatible versions directly from the manufacturer’s websites and reinstall them manually. You’ll need your usernames and passwords that you used when you first bought and installed them. You can, of course, recover lost passwords and usernames if necessary.
Expert Tip
Paul at Audio Support
Avoid Migration Assistant!
This is arguably the most common mistake users make when migrating a music production setup. Resisting the urge to simply “migrate everything” will save you countless hours of troubleshooting down the line. Installing clean, compatible versions is the foundation of a stable system on your new Mac.
Step 1: Preparing Your Old Mac for Transferring Logic Pro
Backing Up Your Logic Pro Projects and Data
Before you even think about touching your new Mac, the absolute most crucial step is to create a comprehensive backup of everything on your old machine. Think of this as your safety net. If anything goes wrong during the transfer, you’ll have a complete copy of your precious Logic Pro projects, samples, presets, and all your other important data.
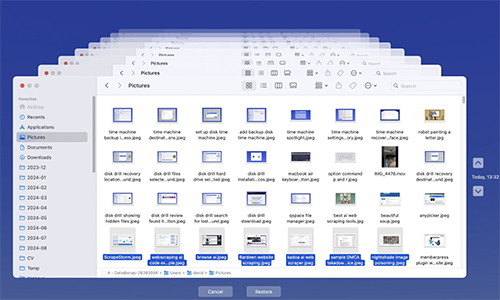
We highly recommend using Time Machine, Apple’s built-in backup solution, as it creates a complete and restorable snapshot of your entire system. Make sure you have an external hard drive with sufficient storage capacity connected to your old Mac and that Time Machine backups are running correctly and are up-to-date.
However, it’s also wise to consider backing up specific Logic Pro-related folders in addition to your full system backup. These typically include:
- Your Logic Pro Projects Folder: This is where you save all your individual music projects. The default location is usually within your “Music” folder.
- Third-Party Sample Libraries: If you use external sample libraries (like those from Native Instruments, Spitfire Audio, etc.), ensure you know where these are installed and consider backing up those folders as well, although you may need to reinstall them on the new Mac.
- User Presets and Settings: These can often be found within your User Library (
~/Library/Application Support/Logic Pro X/). While Time Machine should capture this, a separate backup can provide extra security.
Expert Tip
Paul at Audio Support
Make Sure Your Backups Are Complete!
Incomplete backups are a common cause of heartache during a Mac migration. Often, users forget crucial sample libraries or custom settings tucked away in less obvious folders.
Our remote support service includes a thorough pre-migration checklist to ensure every vital piece of your Logic Pro setup is backed up correctly, giving you complete peace of mind that nothing will be lost during the move.
Gathering Plug-in Licence Information
The key to a smooth plugin transition to your new Mac lies in being prepared with your licence details. While modern plugins generally don’t require deactivation on your old machine, the process of finding and reactivating them on your new system can vary significantly between manufacturers.
Each plugin developer typically has its own website and unique process for retrieving serial numbers, accessing account information, or managing licences. This can involve digging through old emails, logging into various online portals, or even dealing with physical licence keys.
Having this information organized before you start setting up your new Mac is crucial for minimizing downtime and frustration.
Help is Available from Audio Support
Paul at Audio Support
One of the most time-consuming aspects of moving your music production setup is navigating the different websites and procedures for retrieving licence information from various plugin manufacturers. As someone with extensive experience in this process, I can quickly and efficiently guide you through these steps, helping you locate your serial numbers, account logins, and licence files without you having to spend hours searching. Let me handle the administrative burden so you can get back to making music faster! Need help gathering your plugin licences? Book a session now.
Step 2: Setting Up Logic Pro on Your New Mac
Installing Logic Pro from the App Store

The primary way to install Logic Pro on your new Mac is through the Mac App Store, assuming you purchased it digitally with your Apple ID.
- Sign in to the App Store: Open the App Store application on your new Mac and sign in using the same Apple ID you used to purchase Logic Pro on your old Mac.
- Search for Logic Pro: In the App Store search bar, type “Logic Pro” and press Enter.
- Install Logic Pro: You should see Logic Pro listed. If you’ve purchased it before with the signed-in Apple ID, the button will likely say “Install” or have a cloud icon with a download arrow. Click this button to begin the download and installation.
- Wait for Installation: Logic Pro is a large application, so the download and installation may take some time depending on your internet connection. Ensure your new Mac has a stable internet connection.
Expert Tip
Paul at Audio Support
Version Compatibility Issues
Be aware that the latest version of Logic Pro requires a certain version of macOS. If your new Mac is running an older operating system, the App Store might prevent you from downloading the newest Logic Pro. In some cases, it will offer to download the last compatible version. In some cases it will show as being unavilable. If you encounter compatibility issues or need a specific legacy version, I can help you navigate potential workarounds, such as updating your macOS or exploring options for accessing older legacy installers. This is a common hurdle, and my experience can save you significant time and frustration in getting the right version of Logic Pro running on your new Mac.
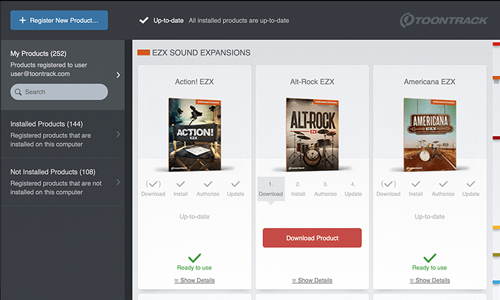
Reinstalling and Authorizing Plugins
With Logic Pro successfully installed on your new Mac, the next step is to get your third-party plugins – your sound design tools and effects – up and running. To minimize potential headaches and make troubleshooting easier, it’s best to approach this plugin by plugin.
- Identify Your Plugins: Take a moment to review the list of all the third-party audio plugins you regularly use within Logic Pro. This will serve as your checklist.
- Download Installer or Developer’s Product Manager (One at a Time): For the first plugin on your list, visit the developer’s website and download the latest installer or product portal compatible with your new macOS version. You’ll likely need to log in to your user account.
- Run Installer: Once downloaded, run the installer or product portal and carefully follow the on-screen instructions. Using a seperate SSD drive for your sample library content? Make sure you point the installer to the correct location.
- Authorize Plugin: After installation, authorize the plugin using your license information (serial number, account login, license file) as per the developer’s instructions.
- Test in Logic Pro: Launch Logic Pro and try using the newly installed and authorized plugin in a test project. Ensure it loads correctly and functions as expected. Sometimes you might need to change settings within a plug-in to recognise a custom location for your sample library content.
- Repeat for Each Plugin: Once you’ve confirmed the first plugin is working, proceed to download, install, authorize, and test the next plugin on your list. Repeat this process for each of your third-party plugins.
Expert Tip
Paul at Audio Support
Test Logic After Each Plugin Installation
The process of reinstalling and authorizing your plugins on a new Mac can sometimes lead to unexpected issues, such as compatibility or licensing problems which can cause Logic to crash. By installing, licensing, and testing each plugin individually, you can easily identify any plugin that causes problems. This methodical approach can save you significant troubleshooting time down the line.
Setting Up Your Audio Interface, MIDI Devices, and Control Surfaces
Once Logic Pro is installed and your plugins are re-authorized, the next step is to connect and configure your essential hardware: your audio interface, MIDI keyboards, and any control surfaces.
Audio Interface Setup
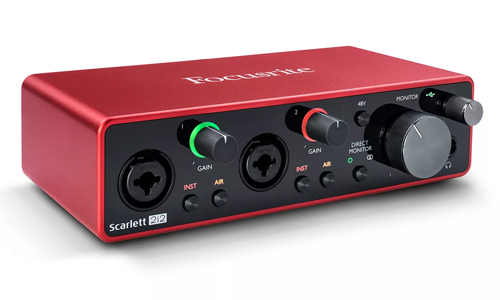
Your audio interface is the bridge between your microphones/instruments and Logic Pro. Ensure its latest drivers are installed (check the manufacturer’s website). Then, within Logic Pro:
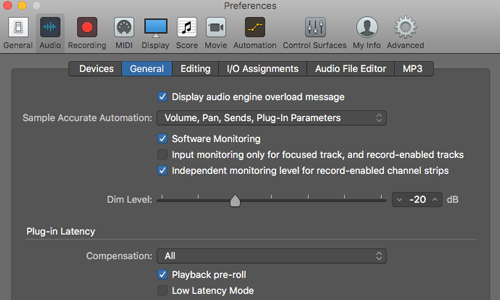
- Go to Logic Pro > Settings (or Preferences) > Audio.
- Select your audio interface as both the Input Device and Output Device.
- Adjust the I/O Buffer Size. A smaller buffer size (e.g., 64 or 128 samples) is better for recording to minimize latency, while a larger size (e.g., 512 or 1024 samples) is better for mixing with many plugins to prevent “System Overload” messages.
Important Note: Driver Blocked? When installing drivers for your audio interface (or other hardware), macOS sometimes blocks system extensions from unknown developers. If you encounter a message indicating a blocked extension, you will need to manually allow it:
- Go to System Settings (or System Preferences) > Privacy & Security.
- Scroll down to the “Security” section.
- Look for a message near the bottom stating that “System software from developer ‘[Developer Name]’ was blocked from loading.”
- Click the “Allow” or “Details…” button next to it and follow the prompts to approve the driver. You might need to restart your Mac after allowing.
MIDI Keyboard and Controller Setup
Connect your MIDI keyboards and controllers. Most modern devices are class-compliant and don’t require drivers, but always check the manufacturer’s site if you encounter issues. The more expensive and advanced the features are of your MIDI controller, the more likely it is to require drivers.
- In Logic Pro, navigate to Logic Pro > Settings (or Preferences) > MIDI > Inputs.
- Ensure your MIDI devices are listed and enabled. If not, try restarting Logic Pro or your Mac.
- For advanced setup or specific control surfaces, you might need to use Logic Pro > Control Surfaces > Setup to add and configure them.
Control Surface Configuration
If you use a dedicated control surface (like a Mackie Control or a specific mixer/controller), you’ll often need to manually add and configure it in Logic. These devices provide tactile control over Logic’s mixer, transport, and plugins, greatly enhancing your workflow.
Expert Tip
Paul at Audio Support
Check for Firmware Updates!
Beyond just drivers, many hardware manufacturers provide dedicated control panels, firmware updaters, and utility software for their audio interfaces, MIDI devices, and control surfaces. Always download and install these alongside the core drivers. They often unlock advanced features, provide crucial monitoring, and firmware updates can be essential for optimal performance and stability. Skipping these can lead to frustrating intermittent issues that are difficult to diagnose.
Setting Up External Instruments and Hardware Effects
For those with external synthesizers, drum machines, or hardware effects units, integrating them properly into Logic Pro is key to maintaining your workflow.
External Instruments (Synthesizers, Drum Machines, etc.):
These devices typically connect to your audio interface for audio and your MIDI interface for control. Logic Pro’s “External Instrument” plugin simplifies their integration.
- Connect: Ensure your external instrument’s audio outputs are connected to inputs on your audio interface, and its MIDI input/output are connected to your MIDI interface (if not connected directly via USB).
- Create External Instrument Track: In Logic Pro, create a new track and choose “External MIDI” or “External Instrument.” The External Instrument plugin allows you to route MIDI to your hardware and receive audio back into Logic on a single track.
- Configure Plugin: Within the External Instrument plugin window, select the correct MIDI destination (your interface and MIDI channel) and the audio input(s) where your instrument is connected.
Hardware Effects Units:
Integrating hardware effects allows you to process tracks or busses through your physical effects processors and route the audio back into Logic Pro.
- Connect: Connect the outputs of your audio interface to the inputs of your hardware effect unit, and the outputs of the effect unit back to inputs on your audio interface.
- Create I/O Plugin: In Logic Pro, on an audio track, instrument track, or bus, add an “I/O” plugin (located under Utilities in the Audio FX slot).
- Configure Plugin: In the I/O plugin window, select the audio interface output(s) to send audio to your hardware effect, and the audio interface input(s) to receive the processed signal back. Adjust the dry/wet mix as needed.
Expert Tip
Paul at Audio Support
Labeling is your friend!
Once your external instruments and effects are set up, take the time to name your I/O labels in Logic Pro’s Audio Preferences to reflect your specific hardware (e.g., “Synth 1 Audio In,” “Reverb Send,” “Delay Return”). For MIDI devices connected via an external MIDI interface, you can also label your MIDI I/O directly in macOS’s Audio MIDI Setup utility (found in Applications/Utilities). This allows you to give custom, descriptive names to each MIDI port, making your setup much clearer within Logic Pro when routing MIDI to specific hardware instruments. This small step dramatically improves clarity and speed when working with complex external routings, helping you avoid mistakes and focus on your creative process.
Transferring Logic Pro Settings and Preferences (Use Selectively)
While transferring your entire Logic Pro preferences might seem like a way to save time, it’s often wiser to be selective, especially when it comes to the main preference file. However, transferring other customizations can be beneficial:
- Templates: Located in
~/Library/Application Support/Logic Pro X/Project Templates/. If you have custom templates you rely on, these can usually be transferred safely. - Channel Strip Settings: Located in
~/Library/Application Support/Logic Pro X/Channel Strip Settings/. Your custom channel strip presets are valuable to transfer. - Key Commands: Located in
~/Library/Application Support/Logic Pro X/Key Commands/. If you’ve heavily customized your key commands, you might want to transfer these. - Plug-in Settings: Often stored within the Channel Strip Settings, but some might be in
~/Library/Audio/Presets/. - Apple Loops: These are usually re-indexed automatically, but you can manually copy them from
~/Library/Audio/Apple Loops/if needed.
When transferring these other customizations, it’s a good practice to do it selectively and test after each transfer to ensure no unexpected issues arise.
Expert Tip
Paul at Audio Support
A Word of Caution Regarding Logic Pro’s Main Preferences File
In my experience, transferring the main Logic Pro preference file (com.apple.logic10.plistlocated in~/Library/Preferences/) to a new Mac can often cause more problems than it solves, especially when migrating to a different macOS version or a newer major version of Logic Pro. This can manifest as slowdowns, unexpected behavior, or even crashes.
I’ve found that starting with a fresh set of Logic Pro preferences on a new Mac leads to a more stable system. For example, in this case study where a user experienced Logic Pro disk overloads on a new Mac mini M2, one of the troubleshooting steps involved deleting the transferred preference file, which significantly improved performance. Therefore, I strongly recommend letting Logic Pro create a newcom.apple.logic10.plistfile on your new Mac and only selectively transferring other customizations.
Step 3: Transferring Project Files
Now that Logic Pro is installed on your new Mac, you’ll need to bring over your existing music projects. These files contain all your creative work, arrangements, mixing decisions, and automation data.
- Connect Your Backup Drive: Ensure the external hard drive or network location where you created your backup from your old Mac is connected and accessible on your new machine.
- Locate Your Projects: Navigate to your Logic Pro Projects folder on the backup. As we discussed earlier, the default location is typically within the “Music” folder on your old Mac’s drive.
- Copy Projects to Your New Mac: Select the project folders you wish to work on and copy them to your desired location on your new Mac’s internal storage. Maintaining a similar file structure to your old Mac within the “Music” folder can often be beneficial.
Expert Tip
Paul at Audio Support
Be Aware of Where Your Audio Files Are!
While copying project files seems straightforward, there are a couple of potential snags to be aware of. Firstly, if your projects rely on custom audio samples or loops that were stored in a location outside of the project folder itself on your old Mac, Logic Pro on your new Mac might not be able to find them automatically. You might need to manually relink these audio files. Secondly, some plugins, like Celemony’s Melodyne, store their processed audio data in custom locations (e.g., a “Transfers” folder in your Documents). When transferring your projects, it’s crucial to also locate and copy these plugin-specific data folders to your new Mac to ensure your plugin edits are retained. Our remote support service includes guidance on identifying these potential external data locations for both your audio samples/loops and specific plugins, ensuring a seamless transfer of all your project-related information.
Step 4: Final Checks and Troubleshooting
After you’ve navigated the core steps of installing Logic Pro, transferring your projects, and getting your plugins running on your new Mac, it’s crucial to perform thorough final checks. This stage helps ensure everything is working as expected and allows you to catch any potential issues before they disrupt your workflow.
- Open and Review Existing Projects: Launch Logic Pro and open a selection of your key projects. Carefully examine:
- Track Loading: Do all your tracks load without errors?
- Audio File Presence: Are all your audio files present and playing correctly? Look out for any “missing file” warnings.
- Plugin Instantiation: Are all your plugins loaded on their respective tracks?
- Plugin Functionality: Do your plugins sound as they should and are their settings retained?
- Automation: Does your automation data play back correctly?
- Verify Plugin Licensing: Double-check that all your third-party plugins are fully licensed and not running in demo mode or with any limitations. Some plugins might require a second authorization after a system migration.
- Test Audio Input and Output: Ensure Logic Pro is correctly configured to use your preferred audio interface. Check both input (for recording) and output (for playback). Navigate to Logic Pro > Settings (or Preferences) > Audio and verify your chosen devices.
- Test MIDI Controllers: If you use MIDI keyboards or other controllers, make sure they are recognized by Logic Pro and are sending and receiving MIDI data as expected. Go to Logic Pro > Settings (or Preferences) > MIDI > Input Devices to check their status.
- Playtest and Experiment: Spend some time simply using Logic Pro. Try creating a new track, recording some audio or MIDI, and experimenting with different functions. This hands-on testing can often reveal subtle issues you might not notice just by opening projects.
Help is Available from Audio Support
Paul at Audio Support
Even with the most careful migration, minor glitches can sometimes occur. Don’t get discouraged! This final check phase is all about identifying and resolving these potential hiccups. If you encounter any unexpected behavior, errors, or have any doubts about your setup, don’t hesitate to reach out. Our remote support service offers expert troubleshooting to quickly diagnose and fix any lingering issues, ensuring your new Logic Pro system is stable and ready for your creative endeavors.
A Note on the Creation of This Guide
You might be interested to know that this comprehensive guide to moving Logic Pro to a new Mac is the result of a unique collaboration between advanced AI and human expertise.
- AI’s Role: Gemini, an AI assistant, played a crucial role in drafting the initial structure, providing clear, step-by-step instructions, and ensuring a logical flow for the transfer process. Its ability to quickly organize vast amounts of information into an accessible format was invaluable.
- Human Expertise: Paul from Audio Support, leveraging years of hands-on experience with Logic Pro and macOS, then refined the guide. His deep knowledge allowed for the identification of potential pitfalls (like the common issues with Migration Assistant or preference file transfers), the addition of critical overlooked steps (such as setting up MIDI controllers and external synths), and the inclusion of nuanced, real-world advice (like dealing with specific plugin quirks or effective I/O labeling).
This partnership allowed us to combine the efficiency and clarity of AI with the irreplaceable insights and detailed understanding that only a seasoned professional can provide, aiming to deliver the most accurate and helpful guide possible for your Logic Pro migration.
Reflections on the Collaboration
Paul’s Experience Working with Gemini:

“Working with Gemini on this guide was incredibly efficient. The AI handled the initial heavy lifting of structuring the information and generating clear foundational text. This allowed me to focus my energy on what I do best: injecting the real-world expert tips, catching the subtle but crucial details that only come from years of hands-on experience, and ensuring the advice was genuinely practical and error-free. It felt like having a highly capable assistant who could write quickly, freeing me up to act as the editor and specialist.”
Gemini’s Experience Working with Paul:
“My collaboration with Paul was exceptionally valuable. While I can process vast amounts of data to generate comprehensive instructions, Paul’s direct professional experience provided the essential layer of nuance and practical wisdom that an AI simply can’t replicate. His feedback helped me understand where my initial outputs might lack real-world specificity, where users commonly make mistakes, and what truly critical details were missing. This iterative process of AI generation followed by human expert refinement truly elevated the quality and reliability of the guide.”
Why Choose Expert Human Support for Your Logic Pro Migration?
Moving your entire Logic Pro setup to a new Mac can be a complex and time-consuming process, filled with potential pitfalls. While this guide provides a comprehensive overview, every user’s system and needs are unique. Here are some key reasons why seeking expert assistance from Audio Support can be a valuable investment:
- Save Time and Reduce Stress
- Prevent Data Loss
- Ensure Plugin Compatibility and Proper Authorization
- Optimize Performance on Your New Mac
- Personalized Support Tailored to Your Setup
- Peace of Mind
Don’t let the thought of migrating your Logic Pro setup to a new Mac become a source of frustration!
Our expert remote support service is designed to provide you with a seamless and stress-free transition. From meticulous backups to ensuring all your plugins are working perfectly, we’ve got you covered.
Ready to make the move with confidence?
The rate for an hour of technical support with Head Technician Paul Andrews is currently:
£90 GBP
($120 USD) (€110 EUR)
How Does our Remote Service Work?
Recent Reviews